Detailed Walkthrough

LocaTrack

Every screen, every button, and why it works the way it does. Read it start to finish once, then keep it handy.

Each step says what to tap, what you'll see, and where there's a choice, which one to pick and why. No computer know-how needed.

Get LocaTrack on the App Store
What's inside

How this guide is laid out

Look for three kinds of boxes. Tip = a shortcut. Why it works this way = the reason behind a choice (worth reading once). Heads up = something you can't undo.
Chapter 1

The words you need

LocaTrack uses a handful of words on purpose. Learn these and every screen makes sense.

PART

The item

One kind of thing you stock: a 20A breaker, a roll of 14/2. A Part is a description - name, photo, category - never a count.

LOCATION

The place

The Shop, a Truck, or a Job site. Every count is "this many at this place."

STOCK

The count

How many of one Part are at one Location. You can't type it in. The app adds it up from the history.

MOVE

Something happened

One line in the history: received 10, used 3, moved 5, fixed a count. Stock is just the total of the Moves.

JOB

The work

A named piece of work - "123 Main St". When you Use a part you can tag it to a Job so you know what the job cost.

REORDER

"Time to buy"

A number an Owner sets per part. When the total across all places drops to it or below, the part lands on the Low stock list.

Why can't you just type a new number? Because if you and your partner both change the same count while one of you has no signal, one number would overwrite the other and somebody's work is lost. Recording what happened ("used 3") means both changes are added together when the phones meet up. It also means the history shows who did what, and when.
Supplier ▶ Shop ▶ Truck ▶ Job Site ▶ Used

That's the life of a part. Every arrow is something you can record in the app.

Chapter 2 · Owner · do this once

First-time setup

The Owner does this once, in this order. Order matters: places first, because every count needs a place to live.
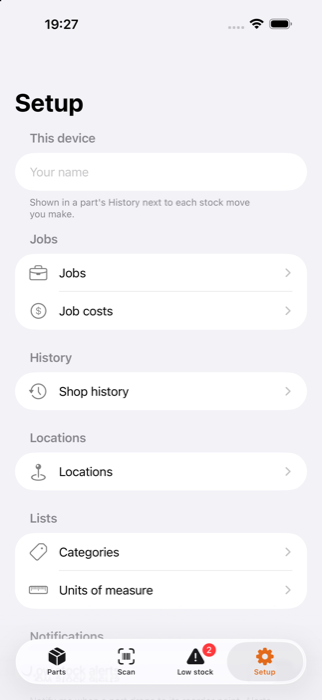
The Setup tab
The Setup tab: where all the steps below start

Step 1 - Add your places

  1. Tap Setup → Locations.
  2. In the Add box, type a name ("Truck 1", "Shop") and pick its Type: Shop Truck or Job site. Tap Add. Type is only a label to help you tell them apart - it doesn't change how counting works.
  3. Repeat for each truck and for any job site you keep stock at long-term.
You don't need a Job site entry for every job. Add one only if materials sit there between visits. For parts that go straight from the truck into the wall, you'll simply tag the Job when you "Use" them (chapter 8).

Step 2 - Check your lists

  1. Setup → Lists has two: Categories (Breakers, Wire…) and Units (each, m, box…).
  2. Tap one to add, rename or archive values. Renaming a value also renames it on every part that uses it.
These are pick-lists, not free typing. That way you never end up with "Breakers", "breakers" and "Brakers" as three different categories.

Step 3 - Put your parts in

Two ways. Pick by size:

A few parts

Parts → +

Add one at a time. Best for a handful. Details below.

Dozens or hundreds

Setup → Import spreadsheet

Fill in a spreadsheet on a computer and bring it in all at once. See chapter 14.

Just trying it out

Setup → Import sample data

Adds generic example parts so you can practise. Use Empty inventory before loading the real thing.

Adding one part - the form, field by field:

  1. Photo (optional). Take photo or Choose from library. A picture helps a new hire pick the right one.
  2. Name. Write it the way you'd say it out loud: "20A Single-Pole Breaker".
  3. Category and Unit from your lists.
  4. Manufacturer barcode (optional). Type it, or leave blank. If the box has a barcode, entering it means scanning the box finds the part later. No barcode? Skip it - LocaTrack gives every part its own code and QR label (chapter 5).
  5. Cost section Owner only: Unit cost (what you pay), Sell price (what you charge, optional) and Reorder at (the "time to buy" number). Pick Reorder at as "how few can I be down to before I'm in trouble?" - enough to cover the days it takes the supplier to deliver.
  6. Supplier note (optional). Supplier name and item code, e.g. "ACME, ABC12345". This is what groups your shopping list by supplier later.
  7. Tap Save.

Step 4 - Enter what's on the shelves today

  1. A new part starts at zero everywhere. Open it → Move stock → Receive.
  2. Pick the place (Shop, a truck) and type what's physically there. Save.
With a big catalogue it's faster to put the starting quantities in the spreadsheet (chapter 14) than to Receive them one by one.

Step 5 - Turn on alerts, set your name, invite your partner

  1. Setup → Notifications → Low stock alerts. On: you'll be told when a part reaches its reorder number. You're told once, and only again if it recovers and drops again.
  2. Setup → This device → name. Type your first name. It's stamped next to every Move you make so the history says who did it.
  3. Setup → iCloud & Sharing to invite your partner - chapter 16.
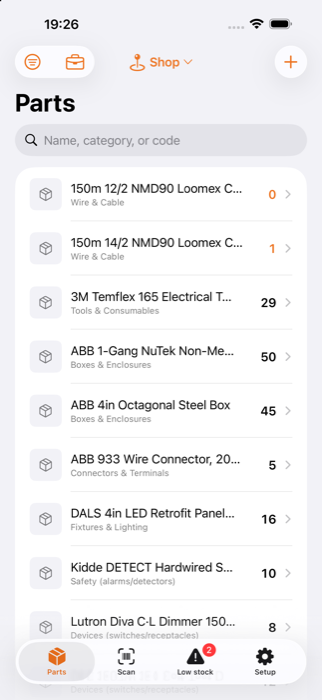
Chapter 3

The tabs along the bottom

Tap a tab to switch screens - they stay in the same spot every time. What you see depends on your role: Owners get four tabs, Technicians get four too, but the last one is different.

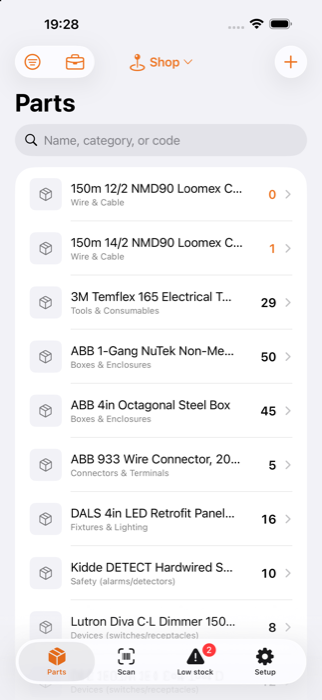
📦 Parts

The home screen. Your catalogue, with a count at your current place. Search it, filter it, do most of your day's work from here.

📷 Scan

Camera. Aim at a barcode or LocaTrack QR label and the part opens.

⚠️ Low stock

Your shopping list - everything at or below its reorder number.

⚙️ Setup Owner

Jobs, costs, history, places, lists, spreadsheets, sharing. Where the business side lives.

👤 Me Technician

Replaces Setup for a Technician. One box: your name, so your Moves are labelled.

The Parts tab
The Parts tab
Chapter 4

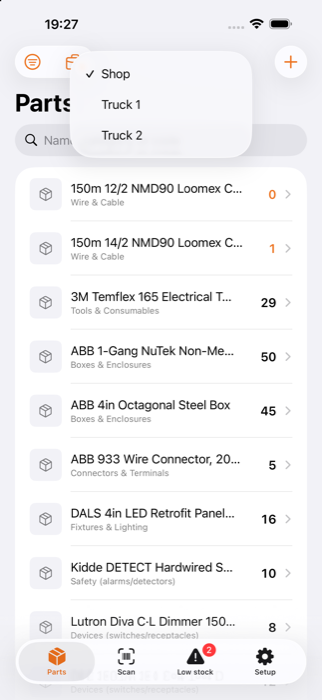
"Where am I?" - the location switcher

At the top of the Parts screen is a small place name - "Truck 1", say. This is the single most useful setting in the app.

  1. Tap the place name at the top of Parts.
  2. Pick where you are or whose stock you're working from: your truck in the morning, the Shop when you're in the building.
  3. The counts in the list now show that place, and quick changes (chapter 7) apply there.
Location menu
Tap the place name to switch
Most of your taps are "I just used one." If the app had to ask "where from?" every time, nobody would bother. So you tell it once where you are, and every quick tap assumes that place. Check it when you start your day - it's the usual reason a count looks "wrong".
The filter menu (chapter 5) has an On [place] only switch. On = show just the parts that are at your place. Off = show the whole catalogue.
Chapter 5

Finding a part

Three ways. Use whichever is quickest right now.

Search

You know the name. Fastest from the couch or the truck seat.

Browse + filter

You're not sure of the name. Narrow by category, or by "what's on my truck".

Scan

The box is in your hand. No typing, no spelling.

A · Search

  1. Tap Parts. Pull the list down a little to show the search bar.
  2. Type a few letters of the name, category or code - "break", "14/2", "wire". Fewer letters finds more. If nothing shows, try fewer.
  3. Tap the part to open it (chapter 6).

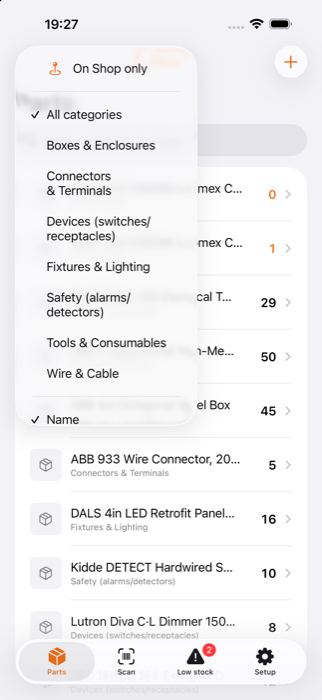
B · Filter and sort

  1. Tap the filter button at the top left of Parts.
  2. On [place] only - show only parts that are here. Handy to see "what's actually on my truck".
  3. Category - pick one, or "All categories".
  4. Sort - Name (A to Z), Low stock first (what needs buying floats to the top), or Quantity.
Filter menu
Filter and sort menu

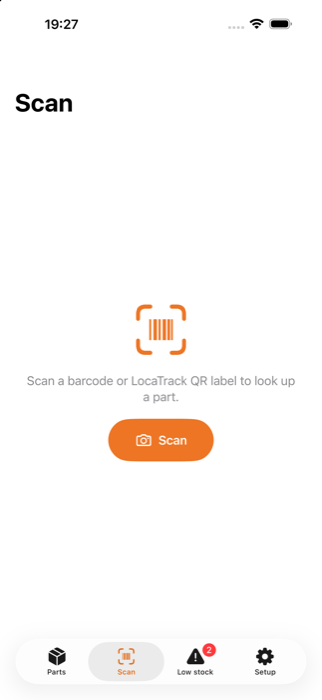
C · Scan

  1. Tap Scan, then Scan (camera) the first time. Allow the camera when your phone asks.
  2. Hold about a hand-width from the barcode or QR label, steady, in decent light.
  3. The part opens by itself.
Scan tab
The Scan tab

If the code isn't known the app says so. An Owner gets an Add part button that starts a new part with that code already filled in. A Technician is told to ask an Owner.

No barcode - loose screws, bulk wire? Open the part and tap Show / print QR label, print it, stick it on the bin. From then on it scans like anything else. This is why every part has a "LocaTrack code".
Scanning needs a real camera. If you're using the app on a Mac, it will ask you to type the code instead.
Chapter 6

Reading a part's page

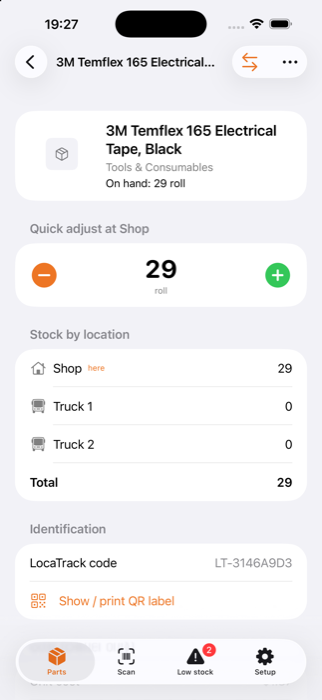
Tap any part. Top to bottom, here's everything on the page.

SectionWhat it tells you
TopPhoto, name, category, and On hand - the total across all places.
Quick adjust at [place]Big − and + buttons with the count at your current place in the middle. See chapter 7.
Stock by locationEvery place with its count, plus a Total. Your current place is marked here.
IdentificationManufacturer barcode (if any), LocaTrack code, and Show / print QR label.
Cost OwnerUnit cost, sell price, reorder number. Technicians never see this section.
SupplierThe supplier note, if there is one.
HistoryEvery Move for this part: what, how many, where, which job, who, and when. Newest first.

At the top right: Move stock for anything beyond a single tap, and Edit Owner to change the part's details.

A part page
A part page
There's no "Edit quantity" anywhere on this page - and that's on purpose. To change a count you record a Move. The History section is where the Moves are kept, so if a count looks off, the answer is usually in there.
Chapter 7 · the everyday one

Quick one-at-a-time changes

Grabbed one breaker? Don't open a form. Three equally good ways to record "one":

On the list

Swipe a row to the right for Received +1.
Swipe to the left for Used −1.

On the part page

Tap the big − or + under "Quick adjust". You see the new count change right away.

Many taps

Tap as many times as you need. Five quick taps show up in History as one line ("5 taps"), not five.

  1. Check the place at the top of Parts is where you are (chapter 4).
  2. Swipe or tap. Your phone gives a small buzz so you know it registered.
  3. The count changes at that place.
Quick taps are deliberately limited: one at a time, current place only, and no job tag. The moment you need more than that - several at once, a different place, or charging a job - use Move stock (next chapter).
Tapped − by accident? Swipe that History line and choose Reverse (chapter 10).
Chapter 8 · four kinds of change

Move stock

Open a part and tap Move stock. Four big tiles appear. Picking the right tile is the only real decision - everything else follows from it.

TileUse it when…Count at the place
ReceiveNew stock arrives: supplier delivery, or a return you're adding back.Goes up
UseParts leave and are consumed - installed on a job.Goes down
TransferParts go from one of your places to another. Nothing is used up.One down, one up
AdjustThe shelf disagrees with the app. Correction only.Whatever you enter
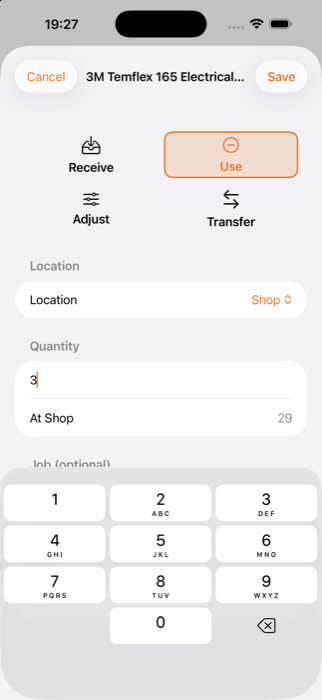
Move stock, Use tile
Move stock: the Use tile
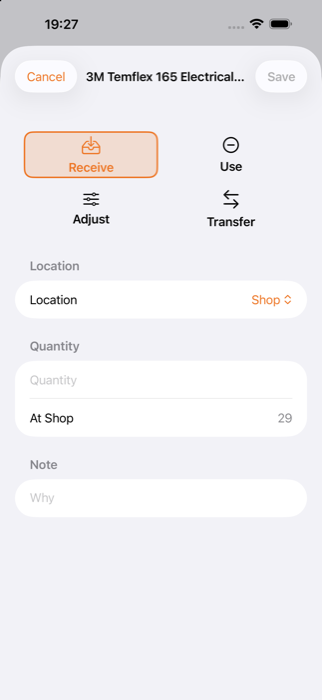
Four tiles
The four tiles (Receive is selected)

The Save button is grey until it makes sense

You can't save half a form: Save stays grey until the quantity is a real number and the places are filled in (and for Adjust, the note). Grey Save means something is still missing, not that the app is broken.

Receive - a delivery arrives

  1. Open the part → Move stock → Receive.
  2. Location: where the stock physically landed. Deliveries usually go to the Shop.
  3. Quantity: a positive number - what came in. Just under it, "At Shop" shows the count right now, so you can see it before you save.
  4. Note (optional): "Invoice 4417", "Return from Main St".
  5. Save.
Type the quantity as a plain positive number for Receive, Use and Transfer. The app handles the plus/minus for you.

Use - parts go on a job

  1. Open the part → Move stock → Use.
  2. Location: where you took them from - usually your truck.
  3. Quantity: how many you used (e.g. 3).
  4. Job (optional) - a new section appears only on Use. Tap it to open a menu: pick a job, choose None, or New job to type "123 Main St" right there.
  5. Save. The count at that place drops.
Job or None? Always pick the job when there is one - that's how the app can later tell you what the job cost (chapter 12). "None" is for shop supplies and shrink that don't belong to any one job. A Job is a real record from a list, not typed text, so "123 Main St" can't turn into three spellings.
If you use more than the app thinks is there, it still records it, but a brief warning pops up saying the count went below zero. That's usually a sign the starting count was wrong - fix it with an Adjust.

Transfer - from one place to another

  1. Open the part → Move stock → Transfer.
  2. Two boxes appear: From and To. Pick them (e.g. From Shop, To Truck 1).
  3. Quantity: how many.
  4. Save stays grey if From and To are the same place.
Transfer or Use + Receive? Use a Transfer. A transfer writes both halves together - shop down, truck up - so the business total never changes. If you did "Use" then "Receive", your job costs would be wrong because the app would think the part was consumed.
Leftovers coming back from a job site? Transfer From the job site To your truck.

Adjust - fixing a wrong count

  1. Walk the shelf and count. Say you find 11 and the app says 14.
  2. Open the part → Move stock → Adjust.
  3. Location: the place you counted.
  4. New adjustment (+/−): type the difference, not the new total: −3. (Use a plus for found extras: 2 or +2.)
  5. Note (required): "Cycle count", "Damaged, tossed", "Found behind the shelf".
  6. Save. The count is now 11.
Adjust is the only tile that takes a plus or minus, and the only one that insists on a note. A correction without a reason is how stock records quietly rot. The old number isn't erased - the History shows 14 → adjusted −3 → 11, with your name and the reason.
Chapter 9 · loading a job

Pick several parts to a job

Loading the truck for a whole job? Don't Move stock part by part. Fill a basket, then post it in one go.

One part, one job

→ Move stock → Use (chapter 8).

Many parts, one job

→ Pick parts to a job (this chapter). One trip through the list.

Just one, no job

→ Quick tap (chapter 7).

  1. On Parts, set your location (chapter 4) to the place you're pulling from.
  2. Tap the briefcase button (top left). A menu lists your active jobs - pick one, or New job to type a new name. The screen changes: an orange bar at the top says "Picking for [job]" so you can't mistake this for normal browsing.
  3. Each row now shows "N on hand here" and a − / number / + control. Tap + for each part and quantity you're taking. You can also type the number. Set a quantity back to 0 and the part drops out of the basket.
  4. Prefer scanning? Tap the barcode button in the bottom bar and scan each box - every scan adds 1 and shows a brief message with the new quantity. A code that isn't in the catalogue says "No part for [code]".
  5. The bottom bar shows the job name and a running count of parts picked. Owners also see the running cost; Technicians never do.
  6. Done? Tap Commit. Every picked line is recorded as Used on that job, at your current location.
  7. A banner appears: "Committed N parts to [job]" with an Undo button. It only stays for a few seconds.
Nothing is recorded until you tap Commit. You can wander off, change quantities, and decide against it. And because the basket is posted as ordinary "Use" Moves, the stock counts and the job's cost report update together.
Job menu
The briefcase menu: pick the job

Leaving without committing

If the basket has items and you try to leave, the app asks. Keep picking returns to your basket. Discard throws it away and nothing changes.

After you tap Commit, only the Undo banner can take the whole batch back, and it disappears after a few seconds. After that, correct individual lines from each part's History (chapter 10) or with a new Receive.
Chapter 10

Undoing a mistake

You never edit or delete a Move. You reverse it.

  1. Open the part and scroll to History (or, as an Owner, open Setup → Shop history for every part at once).
  2. Swipe the line left and tap Reverse (purple).
  3. A confirmation shows exactly what will be reversed, e.g. "Reverse −3". Tap it to confirm, or Cancel. The extra confirmation is there so a slip of the thumb can't undo something by accident.
  4. A new line appears with the opposite amount. The original stays.
The message reads "Adds an opposite entry to the history. The original stays." That's the deal: the record is permanent, so nobody can quietly alter the past, and you can always see what really happened.
A row of quick taps (chapter 7) is one line, and Reverse takes back the whole group of taps in one go.
The three levels of "oops": seconds - the Undo banner (after Commit) · later - swipe Reverse in History · count is just wrong - Adjust with a note.
Chapter 11

Low stock and reordering

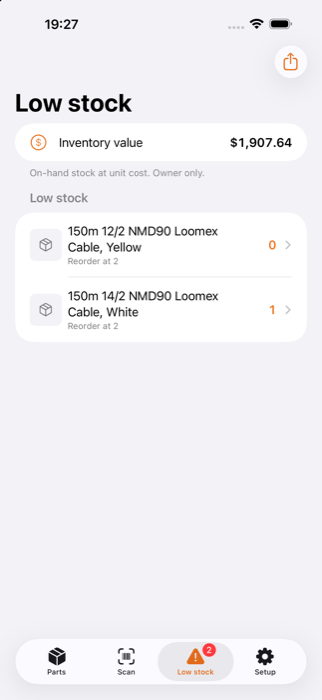
A part appears on the Low stock tab when its total across all places is at or below its reorder number. A part with no reorder number set never appears.

  1. Tap Low stock.
  2. Each row shows the part, its reorder number, and the count it has now (red).
  3. Owners also see Inventory value at the top - what the stock on your shelves is worth at cost.
  4. Owners: tap the Export button to send the list as PDF, Excel or CSV by email or message.
The export is grouped by supplier (from each part's Supplier note), with a subtotal for each. That's one purchase order per supplier, ready to send. "Order" quantity is how many to buy to climb back up to the reorder number - never less than 1.
  1. When the delivery arrives, record it as a Receive (chapter 8). The part drops off the list on its own.
Alerts: with Low stock alerts on in Setup, you're told when a part first reaches its reorder number. They show while the app is open or in use, and only repeat after the part has recovered and dropped again.
The Low stock tab
The Low stock tab (Owner view)
Chapter 12 · Owner

Job costs and Shop history

What did that job cost?

  1. Setup → Job costs.
  2. Job: choose one from the list.
  3. Period: set the From and To dates. Widen them to cover the whole job.
  4. You see each part used, quantity × unit cost, the line total, and the Job total.
  5. Use Export to send it as PDF, Excel or CSV for the invoice.
The report only counts Moves that were tagged to the job. Parts used with Job = None still lower the stock, but won't appear on any bill. If a total looks low, look for untagged Uses.
If a job shows "No usage tagged to this job in this period", widen the dates first.

Where did those breakers go?

  1. Setup → Shop history.
  2. You see the latest 200 Moves across all parts, newest first - what, where, which job, who, and when.
  3. Use the Job menu at the top to narrow it to one job.
  4. Swipe a line to Reverse it (chapter 10).
Chapter 13 · Owner

Tidying up: jobs, places and parts

The app almost never deletes things, because deleting would also delete the history behind your records. Here's what each choice does:

ThingArchiveDelete
Job
Setup → Jobs
Swipe → Archive. Hidden from pickers; cost history stays. Restore any time from the Archived section.Only an archived job that was never used. A job with usage can't be deleted - its cost history is protected.
Location
Setup → Locations
Swipe → Archive when a truck is sold or a site closes. History stays. Restore any time.Not offered. Archive instead.
Category / Unit
Setup → Lists
Archive a value to stop offering it. Rename updates every part using it.If parts still use a value, the app says "In use" and won't remove it.
Part
Parts → swipe
(no archive)Swipe the row left → Delete → confirm. Removes the part and its whole history, on every device. Best for typos and duplicates.
Deleting a part can't be undone, and it also erases it from iCloud. If a part is merely out of stock, leave it - zero is a perfectly good count.

Adding a job ahead of time

  1. Setup → Jobs.
  2. Type the Name ("123 Main St") and, if you like, the Client. Tap Add.

You can also create a job on the spot from Use or Pick - handy in the field.

Chapter 14 · Owner

Spreadsheets in and out

For lots of parts, a spreadsheet on a computer beats typing on a phone. Everything lives under Setup → Catalogue.

ButtonWhat it does
Import sample dataAdds a generic set of example parts. For practising only.
Export blank template (CSV)Gives you an empty sheet with the right column headings, with one example row, to fill in on a computer.
Import spreadsheet (CSV)Pick your finished file. Parts are added or updated and counts are set.
Export inventory (CSV)Sends out everything you have now - parts and the quantity at each place.

A · Start fresh with your real list

  1. Export blank template and email it to yourself.
  2. On a computer, fill in one row per part. Save as CSV.
  3. If you've been playing with sample data, first do Danger zone → Empty inventory. It removes all parts and counts but keeps your places, jobs and lists.
  4. Import spreadsheet (CSV) and choose your file. The app tells you how many parts were added or updated.

B · Round trip: edit your existing inventory

  1. Export inventory (CSV) and open it on a computer.
  2. Change costs, names or quantities. Don't touch the ID column.
  3. Import it back. The app matches rows by that ID, so it updates the existing part instead of making a duplicate.
Changed quantities don't overwrite anything. For each difference the app records an Adjustment to reach your number, so the history still shows what happened. Import also never deletes: removing a row from the sheet doesn't remove the part.
Danger zone (bottom of Setup): Empty inventory deletes all parts and counts. Reset to starter inventory deletes everything and puts the sample parts back. Both wipe iCloud too and can't be undone. Each asks you to confirm; read it carefully before you tap.
Chapter 15

Owner vs Technician

The role controls what's visible. The idea: field workers need to move stock quickly, but don't need to see what anything costs or be able to change the catalogue.

Can they…OwnerTechnician
Search, scan, filter, look up partsYesYes
Quick taps, Receive, Use, Transfer, AdjustYesYes
Pick parts to a jobYesYes (count only, no cost)
Reverse a Move from a part's HistoryYesYes
See the Low stock listYesYes
See cost, sell price, inventory value, job costsYesNever
Add, edit or delete parts; set reorder numbersYesNo
Setup tab: jobs, places, lists, history, spreadsheets, sharingYesNo - gets the Me tab instead

Check what a Technician sees

  1. Setup → Preview as Technician.
  2. The app now behaves like a Technician's. A banner at the top says Previewing as Technician.
  3. Tap Exit on the banner to come back.

Your name on every Move

Owners set it under Setup → This device; Technicians under the Me tab. Your name then appears beside each Move in the History. Set it once - it's what makes "who used the 14/2?" answerable.

Chapter 16

Sharing with your partner

Your phone holds its own copy and shares it through iCloud. Both phones end up with the same counts, with no sign-in screens and no accounts to set up beyond iCloud.

Sending the invite Owner

  1. Make sure your phone is signed in to iCloud (Settings → [your name]).
  2. Setup → iCloud & Sharing → Share inventory.
  3. The iPhone share sheet opens. Choose your partner by message or email.
  4. Choose their access:

    Can make changes

    They join as an Owner: full access, including cost. For a co-owner.

    View only (Read Only)

    They join as a Technician: no cost, no catalogue editing, no Setup.

  5. Send it.

Accepting Your partner

  1. Install LocaTrack from the App Store.
  2. Tap the invite link first (in the message or email) and accept. Don't build their own list first.
  3. The inventory fills in. If it's slow, give it a few minutes with signal.
Opening the invite before setting anything up keeps the partner from creating a second, separate set of starter parts that would collide with yours.

Checking it's working

Setup → iCloud sync shows the sync state. If Share inventory is greyed out, iCloud isn't ready on that phone - check Settings → [your name] → iCloud.

No signal? Keep going

Basements, crawlspaces, rural sites: record as usual. It syncs when you're back online.

Both edit at once

If you both used the same part offline, both changes count. Neither overwrites the other.

Small delay is normal

Syncing takes seconds to minutes. If numbers differ, wait a minute before assuming something's wrong.

Chapter 17

If you get stuck

The count looks wrong

First check the location at the top of Parts - the count shown is for that place. Then open the part and read its History for what happened. If the shelf really differs, record an Adjust with a note.

Save is grey and I can't tap it

Something's missing: a quantity, a place, or (for Adjust) a note. For Transfer, From and To must differ.

I used parts but forgot the job

The stock is right, but the job's cost report is short. You can reverse the Use and record it again with the job picked. Do this from the part's History.

I can't find a part we carry

Try fewer letters. Check that On [place] only in the filter is off and the category is "All". Or scan the box. If it truly isn't there, an Owner needs to add it.

The count went negative

You recorded more going out than the app thought it had. The starting count was probably wrong. Adjust it, with a note.

I don't see prices, the + button, or a Setup tab

Normal for a Technician. Cost, editing and Setup are Owner-only.

My partner's numbers differ from mine

Give both phones a minute with signal and iCloud. Still different? Owners can check Setup → iCloud sync; both phones must be signed in to iCloud.

The camera won't scan

iPhone Settings → LocaTrack → Camera must be on. Good light, steady hand, about a hand-width away. Or type the code in.

I archived a job or place by mistake

Nothing's lost. In Setup → Jobs or Locations, open the Archived section and swipe the row to Restore.

Print this part

Pocket cheat sheet

I want to…Do this
Set where I amParts → place name at the top
Find a partParts → search · or Scan
Use / return oneSwipe the row left / right · or − + on the part page
Use several on a jobOpen part → Move stock → Use → Location + Job → Save
Load a whole jobParts → briefcase → job → + parts → Commit
Log a deliveryMove stock → Receive → Shop
Restock the truckMove stock → Transfer → From Shop To Truck
Correct a countMove stock → Adjust → the difference + a note
Undo somethingPart History → swipe left → Reverse
See what to buyLow stock tab
See a job's cost (Owner)Setup → Job costs
See who did what (Owner)Setup → Shop history